Aws Cloudformation Example Part 2 Deploy And Test A Rest Api Lambda Function
AWS Cloudformation Example Part 2 - Deploy and Test a REST API + Lambda Function

In Part 1 we put together a Cloudformation SAM template for a simple REST API backed by a lambda function. The resulting code is available in this repo.
In this post, we’ll walk through how to deploy the template to AWS and test the API using Postman.
- Install SAM CLI
To deploy SAM templates, you’ll want to install the SAM CLI. Make sure that the IAM user whose access key and secret key you are using has the necessary permissions to deploy this. If you’re doing this as a learning activity on a personal account, as I was, it’s simplest to use the credentials of a user with Administrator access.
2. Clone repository
Now you’ll need a SAM template to deploy, along with the code you want to use in the lambda function. The code we’re using here can be found on my GitHub and was explained in Part 1. Fork the repo and clone it down to your machine.
- SAM build
Using your command line of choice, change directory to the cloned repo. (My main laptop is Windows so it would be PowerShell for me - stop hissing in the background, you lot. I like bash as well.)
Enter the sam build command.
This will package the separate components in the folder (e.g. the SAM template and the lambda code in this example) together into a deployable artifact.
sam build is expecting a file call template.yml in the root of the directory, but of course it is easy to set the template name with the -t option if required. The options are documented here.
You’re hoping for a successful build, like the below:
- SAM deploy
Well, who am I to argue with the suggestion that we use sam deploy --guided ?
The --guided option, as you’d expect, means that SAM will guide you through the process with prompts.
However we want to deploy IAM resources with custom names, which requires a capability called CAPABILITY_NAMED_IAM. So our full command will look like:
sam deploy --guided --capabilities CAPABILITY_NAMED_IAM
You can choose what to name your Cloudformation stack, the Region you want to deploy to, and the values of all the parameters in template.yml. I was happy with the defaults, so I only had to choose the stack name and the last few options.
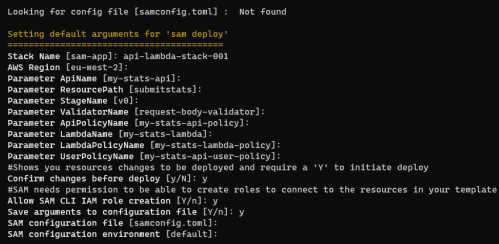
The last 3 options will save the SAM configuration to a config file called samconfig.toml in the root of the directory.
I asked to confirm the changes before deployment, so I get a chance to look at the changeset:
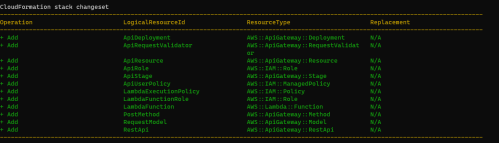
Those look like the resources I asked for in my template, so I will answer in the affirmative to Deploy this changeset? [y/N] .
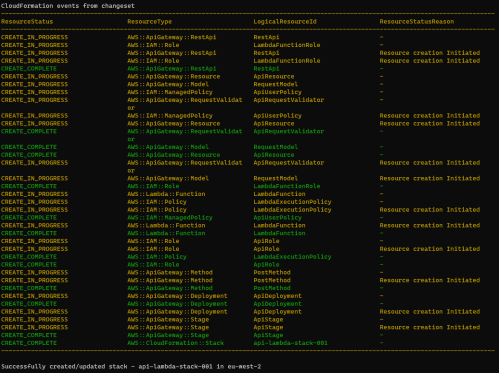
You can watch it being created, and soon enough the stack will be successfully deployed:
- View Cloudformation Stack in AWS Console
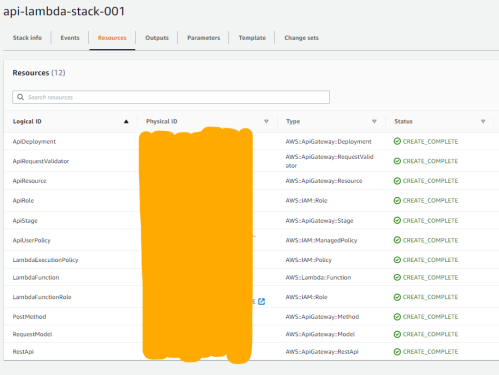
Let’s hope into the AWS console, go to the Cloudformation console and select the stack you’ve just created. If you go to the Resources tab you can see all the resources that have been created. At this point if you’re anything like me you’ll want to visit some of the resources and poke around, see if things are as you expected based on your template.
- Test API in AWS Console
Let’s start testing the API that we’ve deployed. Firstly we’re going to test it from the console, by clicking the “physical ID” of the RestApi resource in the table shown in the image above. This will open up the API Gateway console and let us look at our API.
There’s plenty of interesting things we could look at, but for now click on the POST method and then click the test button:
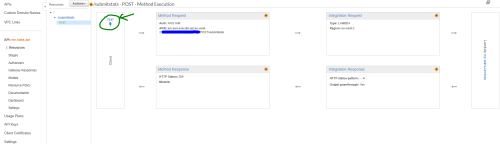
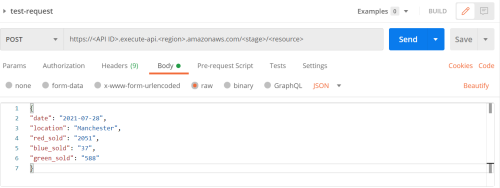
This test bypasses any authorization on the API. For the request body, enter something that matches the schema we set up for submitting sales stats for coloured widgets. It should look something like this:
{
  "date": "2021-07-28",
  "location": "Manchester",
  "red_sold": "2051",
  "blue_sold": "37",
  "green_sold": "588"
}
You’re expecting a matching response
{
  "Notes": "Thank you for submitting data. You submitted the following. Date 2021-07-28 at location Manchester, number of red widgets sold was 2051, number of blue widgets sold was 37, number of green widgets sold was 588."
}
- Create IAM user + attach policy
If we want to use the API properly, we need the right authorization. Last time, I decided to use IAM authorization. We want to create our IAM user separately from the stack, as we want their details to persist if changes are made to the stack.
Follow the instructions here to create an IAM user with programmatic access. Make sure you save the access key and secret key.
The only permissions this user needs are in the API user managed policy created as part of the stack. Attach that policy to the user, and they will have access to this API.
- Install Postman
Postman is a great tool for working on APIs, and it’s particularly easy to send a test API request with Postman and look at the response. It’s especially handy here as it can automatically sign the API request the way AWS IAM expects, using an access key and secret key. Download it here.
- Test API with Postman
Let’s construct our request. Click New in Postman, and choose a basic request. Give it a name and save it.
Select POST from the dropdown, and enter your API’s URL.
The url will be of this form:
https://<API ID>.execute-api.<region>.amazonaws.com/<stage>/<resource>
You don’t need to pass in any query parameters.
Select the Body tab, select the “raw” option and choose JSON from the dropdown. Enter a valid JSON Body.
If you click Send now, you’ll get a “Missing Authentication Token” error in response. This API isn’t available to just anyone - you need to sign your request with the access key and secret key of the IAM user you created earlier.
Go to the Authorization tab and select AWS Signature from the Authorization Type dropdown. Enter your access key and secret key on the right. Click Advanced and enter the AWS region.
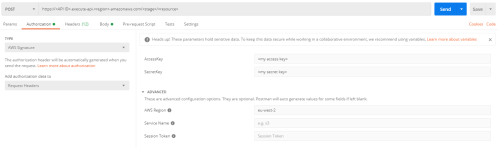
Now when you hit Send, you’ll get the response you expect below your request.
Congratulations - you’ve made and deployed an API Gateway backed by a lambda function with AWS, and tested it from inside and outside AWS!